The “Silent” Problem In the traditional IT world, data leaks were often noisy – an email sent to the wrong person or a USB drive left on a train. But with the arrival of AI, we face a new, silent type of leak: The Authorized Overshare.
Microsoft Copilot is an incredible productivity engine because it respects your existing permission boundaries. If a user can access a file, Copilot will read it. The problem? Most organizations have “permission debt.” Years of “share with everyone” links and broken inheritance mean that a Junior Accountant might technically have read-access to the “CEO Salary Review 2026” folder, even if they never knew it existed.
Without AI, that user would never find that file because they wouldn’t know what to search for. But with Copilot, a simple prompt like “Summarize the salary reviews for this year” instantly surfaces that sensitive data.
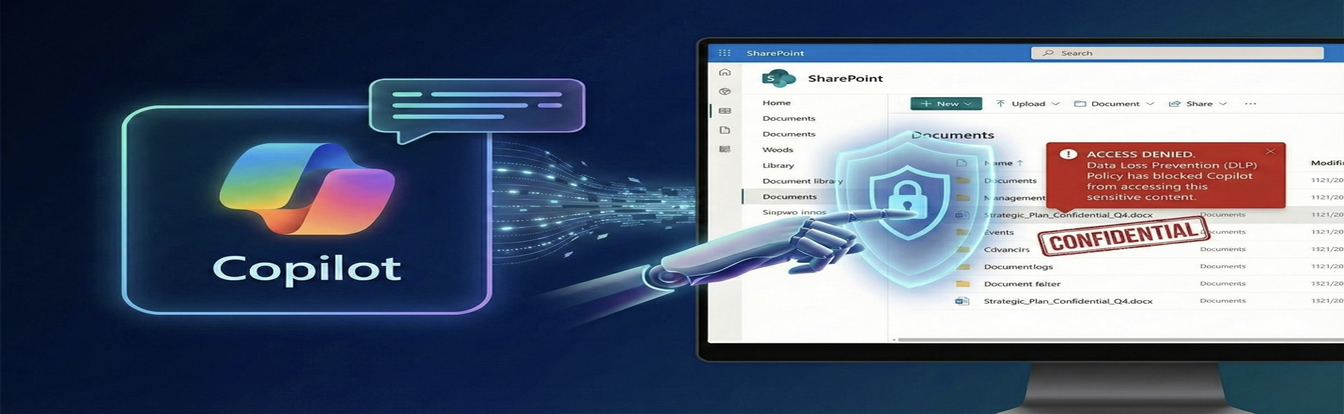
Copilot isn’t breaking the rules; it’s just shining a spotlight on your permission gaps. This is why Microsoft Purview Data Loss Prevention (DLP) is no longer optional—it is the seatbelt your AI needs before it hits the road.
How Purview DLP Fixes the Gap?
Microsoft Purview DLP allows you to create a safety layer that supersedes basic permissions. Even if a user has access to a file, a DLP policy can step in and say, “I see you have access, but because this file contains ‘Credit Card Numbers’ or is labeled ‘Highly Confidential,’ Copilot is forbidden from summarizing it.”
This allows you to roll out Copilot confidently without needing to perfectly fix every single permission on day one.
How-To Guide: Creating a DLP Policy for Copilot
Here are the specific steps to create a policy that prevents Copilot from summarizing or processing your most sensitive documents.
Prerequisite: This method works best if you are using Sensitivity Labels (e.g., “Confidential,” “Internal”).
Step 1: Access the Compliance Portal
- Go to the Microsoft Purview compliance portal (https://purview.microsoft.com).
- Navigate to Data loss prevention > Policies.
Step 2: Create a Custom Policy
- Click + Create policy.
- Choose Custom as the category and Custom policy as the template. Click Next.
- Name your policy: e.g., “Block Copilot from Sensitive Data.”
Step 3: Target the Copilot Location
- On the “Locations” page, toggle Status to Off for all locations (Exchange, SharePoint, OneDrive, etc.).
- Find and toggle On for the location named Microsoft 365 Copilot.
- Note: When you select Copilot, other locations may automatically be disabled. This is normal; Copilot policies often need to be standalone.
Step 4: Define the Rule (The “Trigger”)
- Click Create or customize advanced DLP rules.
- Click + Create rule.
- Name: “Block Highly Confidential Labels.”
- Condition: Click Add condition > Content contains.
- Select Sensitivity labels.
- Choose the labels you want to block (e.g., Highly Confidential, Project Falcon, HR Restricted). click Add.
Step 5: Define the Action (The “Block”)
- Under Actions, you will see an action specific to Copilot: “Restrict Copilot from processing content”.
- Ensure this is selected.
- What this does: If a user asks Copilot to summarize a file with this label, Copilot will refuse and display a message stating that organizational policy restricts this action.
Step 6: Activate
- Turn the policy to On (or “Test with Policy Tips” if you want to be safe first).
- Click Submit.
Pro-Tip: It can take up to 24 hours for DLP policies to sync with Copilot. Always test with a dummy document labeled “Confidential” before rolling out to the entire organization.
Ready to secure your AI journey? Reach out to the experts at AW Infrasec Solution Pvt Ltd for specialized assistance with a safe and compliant Microsoft Copilot and DLP implementation.